Edible low sugar play dough for toddler and preschooler sensory play.
This post comes with a warning to your waistline, because what I am about to show you is disturbingly delicious.
It’s edible.
It’s low sugar.
It’s got only three ingredients.
And it’s called either playdough, play dough or play-doh. (Lol – I can never work it out…)
Most of the edible play dough recipes that I found on the internet called for copious amounts of powdered sugar; more than what I was comfortable with. So I came up with this modified recipe.
1 Cup instant milk powder
1 Cup smooth peanut butter
1 Tbsp honey
Or actually double that as I made two batches, one for each child. These quantities are approxiate – adjust until the dough looks and feels about right. I also included small amounts of sprinkles, pearls, choc chips, stars for decorations. (I figured the sugar in these was worth the “bang for buck”).
Despite how it looks at first glance, I’m still going to call this recipe healthy-ish. There are no artificial colours or flavours (including in the sprinkles – as I chose brands that don’t contain these additives). The dough is high in protein, fat and calcium (all of which are great for my skinny and still growing kids), and only contains marginal sugar from the peanut butter. You could easily reduce the sugar content further by choosing a no added sugar peanut butter (and of course, by omitting the sprinkly ‘decorations’).
And how did it taste? To be honest, I was expecting it to taste only so-so. But I was wrong. It tastes a bit like peanut butter fudge. Totally more-ish. Nom nom nom.
But at the end of the day, this is a playdough recipe, not a dessert. It’s designed to be mixed, moulded and squished. It’s designed to be tasted, but not eaten by the bowlful. (Note to self to remember that last point next time).
And the best bit is that the kids can make it from scratch themselves. Measuring out quantities is excellent early maths practise and mixing it all together is all part of the sensory experience.
This is the first time that my toddler Bee (then 16 months old) has been involved in making play dough in the kitchen. She loved it! She stood in her shabby chic wooden high chair with her very own bowl. She spent a long time just touching, mixing, poking, squishing and tasting. After a while she gravitated to the novelty toothpicks and stuck them in to make a little echidna.
Meanwhile, JJ (my then 3 year and 8 month old preschooler) and I had fun making an ice cream, a Daddy, a Mummy, playing with some of our cookie cutters and sneaking a taste every now and again.
I bought all of the accessory items e from either our local grocery store or discount shop. The cute lion, zebra and butterfly cookie cutters that we used as stampers above are from this set of animal cookie cutters and this Easter cookie cutter set (both affiliate links*).
Lots of fun for everyone!
For more squishy sensory play, here are some of our other ideas. (Click on the image to go through to the full post).
These, and other fun ideas are all over on our Play Ideas page.
And are you following us on Pinterest? We pin lots of great ideas over there as well.
*An affiliate link means I may earn a referral fee or commission if you make a purchase through my link, without any extra cost to you. Fees like this helps to keep this little blog afloat. Thanks for your support.
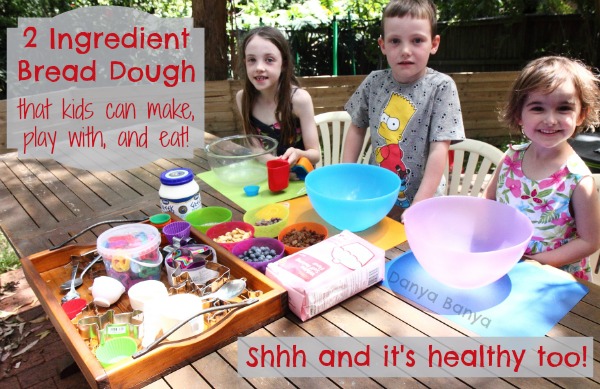
Super easy bread dough that kids can make, from just two ingredients! Fun sensory dough to play and eat.
Who said you can’t have your sensory dough and eat it too?
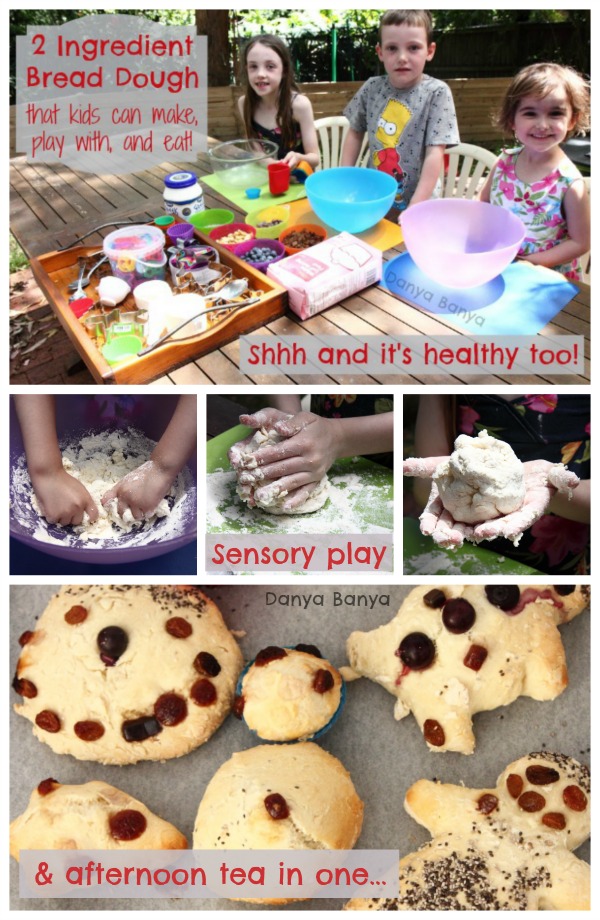
This is an easy and healthy recipe for bread dough that kids enjoy making, playing with, baking and eating. And it’s made from two basic ingredients that you probably already have in your pantry.
Yes, just two! Told you it was easy…
To make an easy bread dough all you need is:
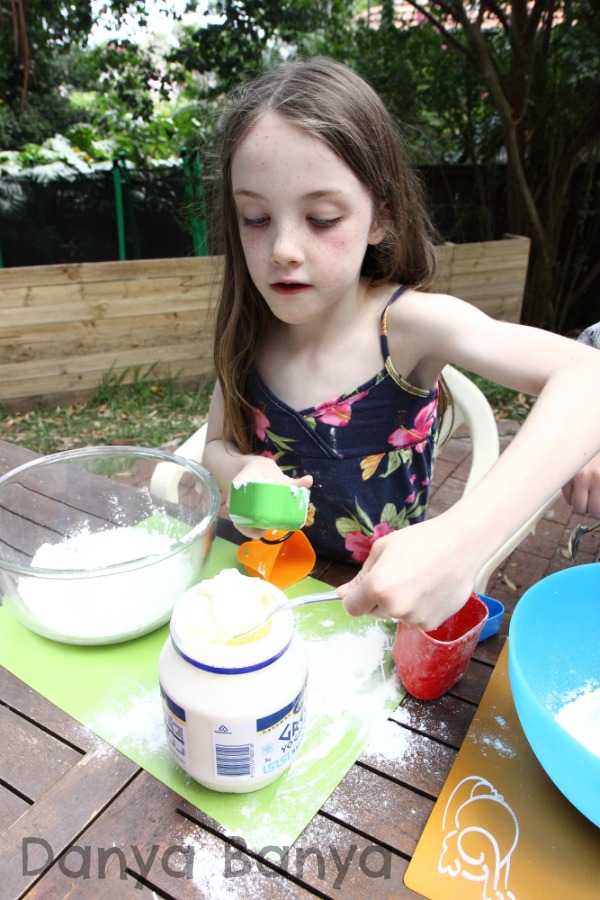
1 cup of self-raising flour
2/3 cup of Greek yogurt
(If you don’t have self raising flour, then you can make your own version by adding 1 teaspoon of baking powder to 1 cup of plain flour. You could also substitute natural yogurt instead of Greek yogurt if you prefer.)
Getting the kids to help measure out the quantities is fantastic meaningful maths practice, incorporating counting, measuring, number recognition and volume concepts.
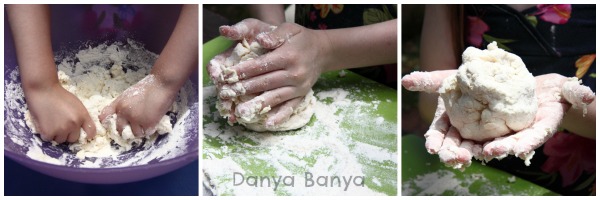
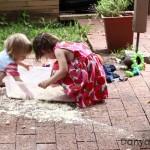
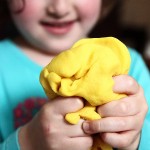
Then it’s time to get their hands busy! Mixing, squashing, squishing, kneading, moulding, squeezing, pulling, pushing, rolling, pinching, patting, flattening. A great work out for the tiny fine motor muscles in their fingers and hands. And it’s such delightfully messy, sticky, gooey play.
(Having dough covered hands is sensory overload for some kids. You might get asked to wash hands mid-play like we did. Once their hands are clean, they’ll probably be ready to get them messy all over again.)
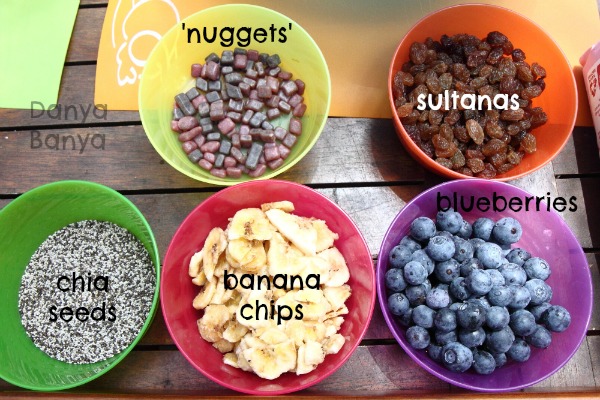
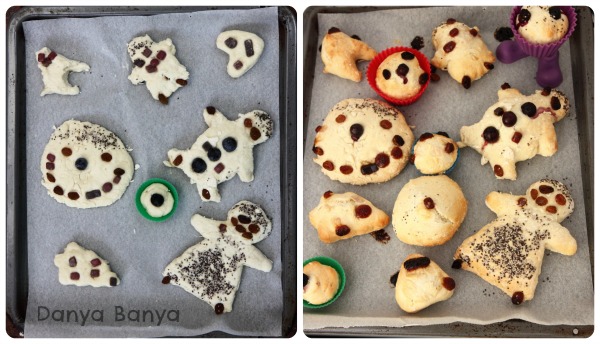
This bread dough can be baked just like this, but we thought it would be fun to add a few decorations and extend the play. We used fruit nuggets, sultanas, chia seeds, banana chips and blueberries, along with our cookie cutter stash and some silicon cupcake moulds.
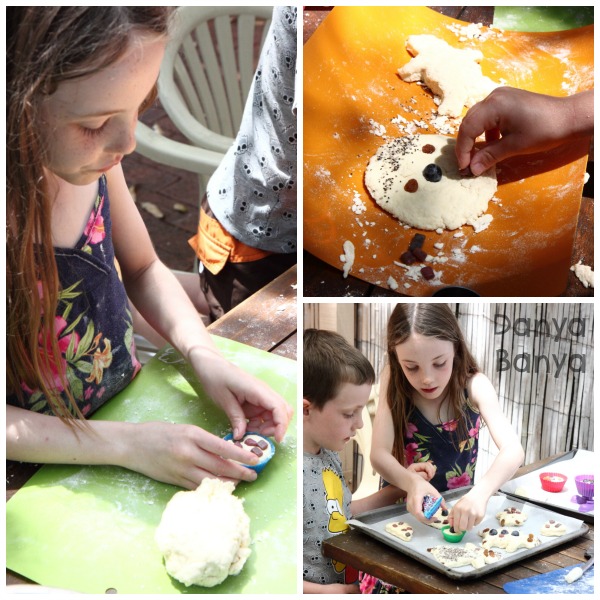
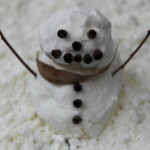
There was lots of discussions about what to make, and how to decorate it. The gingerbread cookie cutters were popular, with sultanas being used for eyes, blueberries for buttons and chia seeds for hair. The cupcake moulds were also hit, with abstract designs on top. A few of the decorations bypassed the dough and were popped straight into hungry mouths.
This is an open-ended activity where kids can choose how elaborately they would like to decorate their bread, which makes it suitable for a range of ages. We had 3, 4 and 8 year olds all playing happily together. Edible doughs are a good idea for babies and toddlers too who may be still in the mouthing phase.
When their creations are ready, just pop into a moderate 180 degrees Celsius (356 degrees Fahrenheit) until they are brown. Here’s a before and after photo, where you can see that not only does the colour change, but the bread rises slightly in the oven too.
Afterwards, there’s that special kind of silence which means everyone is enjoying their snack. #nomnom
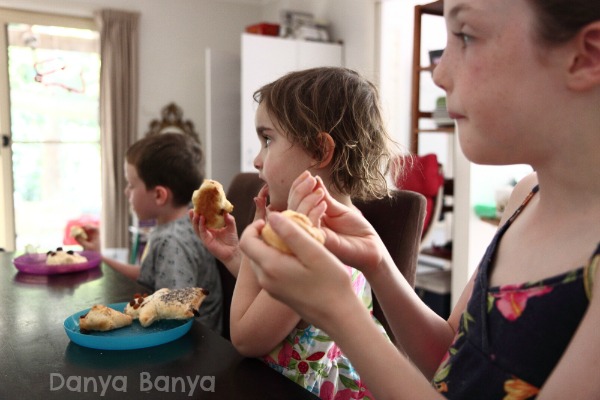
We’ve made this bread dough lots of times (especially when I have yogurt in the fridge that is nearing expiry). It’s a great for breakfast, morning tea, lunch, afternoon tea – any time really. There’s no artificial colours, flavours, preservatives (and if you leave out the nuggets, there’s also no added sugar). It’s also egg-free and nut-free, which is great for our friends and family members who have egg and nut allergies.
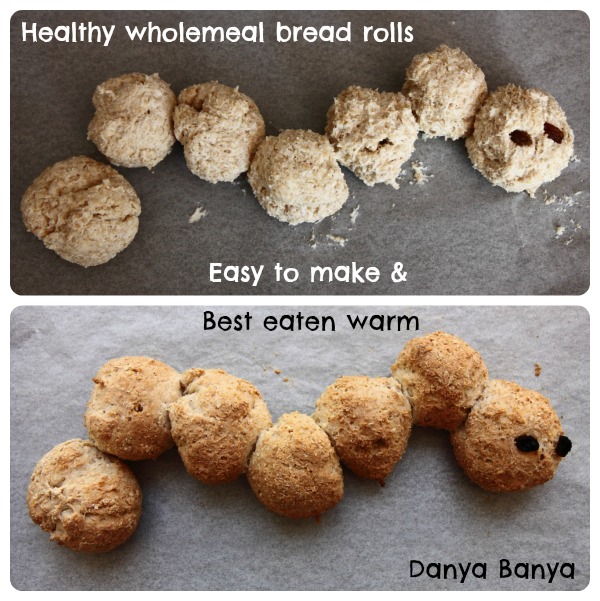
The recipe is based on Dairy Australia’s Easy Yogurt Dough. Usually we make it with wholemeal (whole wheat) flour, adding that extra bit of fibre and flavour. Either way, they are best eaten warm straight from the oven, perhaps with a little bit of butter.
Here’s some we made in a caterpillar shape. Seems we’re on a caterpillar roll lately… Boom tish!
I’ll be linking this up as part of Lemon Lime Adventure’s 12 Months of Sensory Dough challenge. Pop over for lots more edible dough inspiration! I’ll also be bringing you an edible peanut butter dough recipe shortly, so stay tuned…
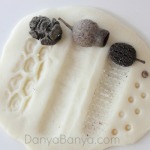
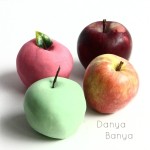
Check out some of our other sensory dough posts: (click on the picture to see the full post).
These, and other fun ideas are all over on our Play Ideas page.
Are you on Pinterest? See what we’re pinning here:
And while I have you, I’d also like to take the opportunity to announce the winner of our Peppa Pig – The Big Splash competition for Life’s Little Treasures Foundation, where I asked ‘What gigantic cartoon person would you (or your kids) most like to meet and why?’
Congratulations Theresa, you won with your comment “Zoe would love to meet a life size Care Bear. She’s into all the vintage characters which are making a come back recently such as Care Bears, Strawberry Shortcake and My Little Pony. Luckily I held on to some of my original toys. Your girls must have loved meeting Peppa! They are growing so fast!”
Congrats again Theresa, please check your inbox (or spam folder) for a message from me.
Yup, you heard me. I’m going to show you how to cook the most tender, succulent turkey with your Esky.
I love cooking with turkey because:
It’s healthy. (Turkey is a rich source of protein, is low in fat (excluding the skin) and is low GI. It is also a source of iron, zinc, potassium, phosphorous, B6, niacin, selenium).
It makes you happy and sleepy. (It contains trytophan amino acid which makes you drowsy and produces serotonin).
This recipe is easy enough that even the non-cook of the house can make it, (which in our case is me). It will also earn said non-cook “MythBuster Chef” status with all your friends
This recipe frees up your oven for whatever else you might be serving. Or alternatively you can cook it where no oven is available.
And it’s delicious!
But before we get onto the nuts and bolts of how to cook this dish, I wanted to introduce a term that you may or may not be familiar with: Sous-vide. Sous-vide literally means “under vacuum”, and is a style of cooking that has come into vogue in professional kitchens recently, but hasn’t yet taken off in most Australian households, partly because no one knows about it, and partly because it usually involves purchasing expensive cooking equipment.
Sous-vide cooks food (usually some form of meat) in an airtight bag which is submersed in temperature-controlled water for long periods. The benefits are:
you can cook the food evenly all the way through.
the food retains all the original moisture, so the results are more tender.
because the maximum temperature is set, there is no risk of overcooking the outside.
I’ve eaten salmon fillet (in a fancy schmancy restaurant) that was cooked sous-vide style at 40 degrees for 24 hours. It was cooked through, but still retained the texture and moisture of sashimi. Absolutely heavenly. The sous-vide equipment that the restaurant used was AU$20,000 each. A bit too expensive for my home kitchen…
Household sous vide machines are gradually becoming more economical. Mr Banya has been lusting over various models for ages. Unfortunately the one he wants isn’t available for 240 volts yet. So instead he went all MacGyver and came up with a DIY solution.
Enter the humble Esky (aka portable cooler, beer cooler, ice cooler, chilly bin…) Every honest Australian has one (or several). Add some ice and they are fantastic at keeping things cold. Turns out if you add hot water, they are also fantastic at keeping things hot for long periods.
OK, enough of the background. Let’s get on to this turkey recipe, shall we?
Mr Banya first cooked this for 18 people for Christmas dinner a couple of months ago. We picked up a 5kg free-range turkey on Christmas Eve, which Mr Banya butchered himself and cooked the breast sous-vide style (as below), with confit turkey drumsticks and roast turkey wings, served with homemade apple and cranberry sauce. Nom nom nom!
But when I cooked turkey breast again a few days ago, I skipped the whole butchering-it-yourself step…
Either way, put the turkey fillets inside a large zip lock bag, along with some butter and a few sprigs of thyme like the middle photo above. Then release all of the air and seal the bag. Hint: if you partially submerse the bag in some water, the water pressure helps push any little airporckets out resulting in an almost-vacuum-sealed effect without fancy equipment. The photo above on the right shows what it looks like once it has been sealed and is airtight.
The next step is to fill the Esky (or half fill, depending on how large it is) with hot water from the tap. Check the temperature. (We use a meat thermometer that can be partially submersed in the water to give an accurate reading). Top up the water with boiling water from the kettle until you reach 60 degrees celcius (or 140 degrees fahrenheit). Don’t let it go above this temperature. (If it goes above, add cold water until you reach 60 degrees again.)
Submerge the bag with the turkey inside into the hot water. If it floats, then there are air pockets – take it out and reseal it (using the cold water submersion method above). If it continues to float, then put something on top to weigh it down so it is fully submerged.
Then put the lid of the Esky back on, and keep an eye on the temperature to make sure it doesn’t drop below 56 degrees Celsius (133 Fahrenheit). If it gets down to 56 degrees, add some additional boiling water to bring the temperature back up again, taking care that it doesn’t go above 60 degrees.
With our Esky size, in the middle of an Australian summer, I found that the water temperature dropped about two degrees an hour. So I only needed to top it up once.
Cook it like this for a minimum of two hours, preferably three.
This is what it looks like when it comes out.
Don’t be put off by the white colour. That’s because the outside is cooked to exactly the same degree as the inside.
The next step is to flash pan-fry (on medium to high heat) all sides until golden.
And that’s it.
Beautifully cooked, succulent tender turkey with minimal effort.
Great for a dinner party, because most of the time it cooks itself, with you only needing to keep an eye that the temperature doesn’t fall too low. The results are so moist, that it’s almost a crime. And you get to strut around telling everyone how you are cooking dinner in an Esky…
We served it with wholemeal Israeli pearl cous cous, lightly steamed beans and carrots, and some left over homemade cranberry and apple sauce from Christmas.
And it’s not just a dish for adults. Both my girls (JJ who is 3.5 years and Bee who is 17 months) gobbled it up.
750g Turkey breast Knob of butter A few sprigs of thyme Large zip lock bag Oil for pan-frying
Meat thermometer (or other accurate thermometer to check water temperature)
Esky
Method
Put the turkey breast into a zip lock bag with a knob (or two) of butter, and a few sprigs of thyme. Remove all the air from the ziplock bag and seal. (Tip: if you partially submerge the bottom of the bag in water, it is easier to remove all the airpockets).
Fill an Esky with hot water. Check the water temperature and top up with boiling water until it reaches 60 degrees Celsius (140 Fahrenheit).
Submerge the turkey in the airtight bag, making sure that it doesn’t float.
Check back on the water temperature periiodically to make sure that it doesn’t fall below 56 degrees Celsius (133 Fahrenheit). Top up with boiling water where necessary, making sure that the water temperature never exceeds 60 degrees.
After 2-3 hours, remove the turkey and pan fry until lightly golden brown.
Serve, and enjoy!
Australian readers also have the chance of winning a couple of Steggles sample bags which include a cooler bag, apron, sweat bands, recipe cards and discount coupon offer for your next purchase.
To enter, simply tell me a funny turkey joke, story or poem in the comments below.
Q: What would you get if you crossed a turkey with an evil spirit? A: A poultrygeist!
Q: Why did the turkey cross the road twice? A: To prove he wasn’t chicken!
xx Danya
This is a sponsored post for Steggles. The above opinions and recipe are all my (or my family’s) own.
Steggles Turkey Shortcuts are a fresh, exciting range of turkey cuts from Steggles delivering simple, tasty and healthier meals. The products are high in protein and low in fat, with mince and breast fillets awarded the Heart Foundation Tick. Visit www.steggles.com.au for recipe ideas and inspiration. Steggles Turkey is available in Coles (excl. WA) and selected IGA’s.
Competition Terms & Conditions 1. One entry per person. 2. Giveaway open to Australian residents only. 3. Please include a link to your profile or supply a valid email address. Entries can also be emailed to danyabanya@gmail.com. No valid email = no entry. I need to have a way of contacting you to tell you if you’ve won! Don’t worry, I won’t spam you. 4. Closing date for entries is Monday 24th February 2014. 5. The prize is one of two Steggles Showbags, each valued at AU$50.00, containing an apron, sweat band, recipe cards and a discount coupon offer. 6. The competition is a game of skill and the response Mr Banya deems most interesting or unusual wins. His decision is final. 7. The winners will be published on www.danyabanya.com and notified by email and will have one week to reply. If no response is received, the prize will automatically be forfeited and a new winner chosen. 8. Prizes will be distributed by Steggles. Danya Banya takes no responsibility for loss or damage of the items. 9. Good luck!
Sprinkle Sticks! Don’t these look so naughty! Well, let me tell you a little secret. They’re actually not as bad as they look. And the kids go wild for them!
Why are they healthy-ish?
Well, firstly they are egg-free, making these a great party food option for those who are allergic to egg (like the eight year old girl whose birthday these were made for).
They have none of the artificial colours that send kids berko. (The no artificial color sprinkles are in more pastel hues than the artificial colour variety. I think they are no less beautiful and the kids certainly don’t notice the difference).
Actually, these sprinkle sticks are completely free of all of these nasty additives, with the exception of palm oil. My issue with palm oil is not so much for health reasons, but rather that the unsustainable harvesting causes havoc for wild orang-utans and tigers in Sumatra. (If you know of a good palm-oil free dark chocolate, please let me know in comments.)
Dark chocolate has all sorts of health benefits. It is much lower in sugar than it’s milkier cousin, and contains loads of soluble fibre, minerals and antioxidants, just to name a few.
And whilst these sprinkle sticks are certainly not sugar-free, they do have enough of the good stuff to make these (in my opinion) a healthier ‘party food’ than what is normally available.
To make them, you’ll need:
Good quality plain grissini (also called breadsticks)
Good quality dark chocolate
Sprinkles (also called ‘hundreds and thousands’) with no artificial colours or flavours
Empty egg cartons
Step 1: Turn your egg cartons upside down, and make little holes along the bottom, like this.
Step 2: Melt the chocolate in a bowl over boiling water. Once melted, scoop the chocolate over the grissini, leaving the bottom 5cm (2 inches) or so clean. Scrape off the chocolate so that you can see the grissini showing through and only just a small amount remains (as per the photo).
Step 3: WAIT. You need to wait for around a minute so that the chocolate can cool enough so that it doesn’t melt the sprinkles. Non-pro tip: don’t wave the stick around trying to get it to cool faster. It won’t, and you’ll end up with tiny drops of chocolate all over your kitchen.
Step 4: Once you’ve waited for the chocolate to cool slightly, you can add the sprinkles by (you guessed it) sprinkling them over the chocolate stick. Have a bowl underneath to catch the sprinkles that don’t stick – you’ll be using these ones again for the next stick. Trouble shooting tip: Are your sprinkles melting into the chocolate? Then you didn’t wait long enough. See Step 3.
Step 5: Stick the fresh sprinkle stick into one of the egg carton holes to set.
They can set at room temperature, or if you live in a very hot & humid climate, or if you are just in a rush, they can also be set in the fridge for a short period of time.
If you have any left over chocolate and sprinkles, for extra points add a rim to the container that you’ll be displaying them in too. (I got this tip from One Perfect Day’s Chocolate Spoons – which might I add are totally drool-worthy.)
Yum! The ‘handle’ at the bottom makes for less mess (although having a wet cloth handy to wipe faces afterwards is highly recommended.)
How to make mini caprese salad skewers – healthy appetizer for Christmas , in red, white and green!
We had our Preschool Mums’ Christmas drinks on Friday night. As a stay-at-home-mum, I’m viewing this as my work Christmas party!
JJ has only started at this preschool recently, so it was also a chance for me to get to know the other mums, some of which I hadn’t met before.
The two-day group mums were expected to bring a plate of finger food to share. I wanted to offer something fun, yet healthy, so I chose to make one of my (and my sister-in-law’s) favourite party dishes, mini caprese salad sticks, in red, white and green!
Caprese salad is not new. The combination of tomato, basil, mozzarella (or in this case, boccocini) and olive oil has dated back, well I’m not exactly sure, but as long as I can remember at least. Serving Caprese salad on toothpicks makes this a bite sized appetiser, and the red, green and white are the perfect colours for the festive season.
Ingredients: 2 punnets Cherry Tomatoes Half a bunch Basil Leaves 400g Boccocini Pearls 1/3 cup Olive Oil 3 Tablespoons Balsamic Vinegar Sea Salt Toothpicks
Method: 1. Skewer a half cherry tomato, large folded basil leaf (or several smaller leaves), and a boccocini pearl onto each toothpick.
2. Reduce balsamic vinegar in a saucepan over medium heat for a minutes or two, until caramel flavours start to come through.
3. Drizzle the skewers with olive oil and caramalised balsamic vinegar. Sprinkle with crushed sea salt.
4. And enjoy!
It was so lovely to really get to know the other preschool mums. I didn’t expect to laugh so much. It was nice for all of us to let our hair down. Yes, my head was a bit sore the next day, but it was worth it. 🙂
JJ will follow probably most of this same group of kids (and their mums) for the next eight years – and I think it’s going to be fun.
JJ’s Early Learning Preschool had an election bake sale recently, which happened to be on the same day as we were holding Bee’s first birthday. Argh, as if I didn’t have enough baking to do already! So I needed something that was quick and easy, could be made beforehand, and would still be yummy.
The solution: Anzac biscuits! Or more specifically ‘wholemeal, egg-free, high fibre Anzac biscuits’. (Don’t you love it when treats are sort of healthy-ish too.)
Now, before we go on, I can hear my international readers thinking – what are Anzac biscuits!?
As far as stories go, this one starts on a late September afternoon. Granny and Pop were visiting, and we were sitting outside eating some oranges. I’d just posted about our family of Orange Faces that JJ and I had drawn the week before, and a few readers had commented that they would be a good Halloween idea. And since I had a fresh bag of oranges just waiting to be decorated….
This time it was a joint birthday party for Bee (turning 1), our friend Megan (turning 40!) and myself (turning 36 21).
Really this post is just an excuse to share this number one cake that I made for Bee, made with the other half of the batter from her other birthday party.
Here’s how to do it:
I covered the whole lot with white fondant (ready-to-roll) icing and added natural food colours (free from these nasty food colour additives) to the remaining fondant. Then I cut circles in three different diameters and randomly stuck them using a touch of water to act as glue.
Megan also made this cute egg-free cake (from this recipe), as we had a few guests with egg allergies. It tasted like raw cookie dough. Yum!
I made some more of my healthy-ish wholemeal banana and blueberry muffins (with no added sugar), and a few of my wholegrain chocolate crackles – recipes below.
Wholemeal Banana & Blueberry Muffins2 overripe bananas mashed (defrosted from frozen is perfect) 1 egg 125mL water 125mL oil (I use an extra light refined olive oil, which has a mild flavour, low smoke point and is liquid at room temperature) 250g wholemeal self-raising flour (or add an extra 2 teaspoons baking powder if using plain flour) 1 teaspoon bicarb soda (also known as baking soda) 1/4 teaspoon baking powder 1 cup blueberries (frozen is fine)
Preheat oven to fan-forced 180 degrees Celsius. Mix banana, egg, water, oil, flour, bicarb soda and baking powder in a large bowl until combined and mostly smooth. Gently fold in the blueberries (if you mix too much you’ll turn the batter blue). Spoon into patty pans, silicon cupcake moulds or greased muffin trays. Bake until the tops are golden and spring back lightly when pressed, which was about 10 minutes for the mini muffins and about 15-20 minutes for the larger muffins. My tip – turn the trays around in the oven at about the half way mark so they cook evenly.
Wholegrain Chocolate Crackles75g of puffed wholegrains and cereals (I use a mix of all-bran cereal and puffed corn, brown rice, millet and kamut) 150g of milk chocolate buttons 100g butter 4 tablespoons golden syrup
Mix wholegrains in a large bowl. Melt chocolate, butter and golden syrup together, and pour over wholegrains. Spoon into paper cupcake cups (the sort that are sturdier than your usual patty pans), and pop in the fridge to set. Yum!!
And to finish off I couldn’t resist throwing in a few photos of Bee, who is using a variety of methods to get around these days…
Phew – two birthday parties down, I think we’re almost all birthdayed out!